Easy III: Technician Guide
This guide will go over the basics of setting up a patient, starting a recording, and reviewing a recording. The Easy III system is intended for use by a physician or a trained technician under the supervision of a physician in a hospital, clinic, physician’s office, or other appropriate testing environments.
This guide will cover the basics of operating the Easy III hardware and software and it is assumed that the user has adequate clinical training. The operator must be trained to recognize the difference between signal artifacts and valid bio-signals caused by movements, interference, or misplacement of sensors or electrodes. If you would like information on workshops, trade shows, and learning materials, please visit Cadwell Events and Suggested Reading.
Please note this guide will assume all equipment and cables are in working order, the montages, data maps, and other devices have been configured by biomed, and the patient has been set up correctly.
Section I: Patient Setup
EEG
Prepare your patient according to laboratory protocol. Attach the electrodes to the patient and connect them to either the main Amplifier or to the Remote Input Box. The Remote Input Boxes allow electrode extension 10 to 20 feet from the amplifier. Verify electrodes and sensors are plugged into the correct connectors. Make sure both the Power/Com Module and Amplifier are on and have green LED lights.
Please make sure CZ and ISO Ground are properly connected to the patient as they are required by the other electrodes.
EasyNet Modules
EasyNet Modules are plug-and-play devices that can be configured to collect channels such as body position, limb movement, and SpO2 data concurrently with other PSG or EEG channels. The first time a study is started on a given system with a new EasyNet module, the EasyNet Module Mapping window will appear. Select the corresponding Device Number from the pull-down that matches your module being used, select Done when completed. This is a one-time occurrence per new module used with a given Easy III acquisition system. If you change the EasyNet Module, you will have to repeat this process.
The following EasyNet modules can be centrally connected to the EasyNet hub:
- Body Position Module – The Body Position Module is helpful in determining if the patient is upright or laying in the supine or non-supine body positions. A PSG summary report is available to summarize the body position data. The module attaches to a chest strap with Velcro.
- Limb Movement Module – Limb movement modules contain accelerometers that indicate limb movement. Up to 4 modules can be placed on the patient to observe individual limb movements. Wrist and ankle straps can be used to place the modules on the patient limbs.
- Nasal Pressure Airflow Module – This module provides a pressure airflow signal that can be utilized oral and nasal airflow. The module is attached to a chest belt with Velcro.
The following EasyNet module is best connected directly to the amplifier.
- SpO2 Module – This oximetry module will collect SpO2 and Pulse Rate data. The channel data can be included in a montage and summarized in a sleep oximetry summary report. The module can be worn on the body in a chest or limb strap. The module can also be placed adjacent to a sleeping patient on a table.
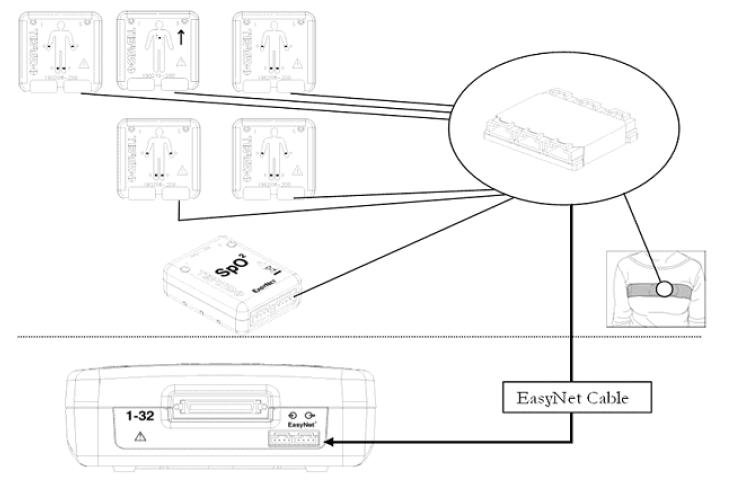
EasyNet Hub
The six-port EasyNet Hub may be secured to a chest belt with its Velcro backing, providing a central connection point for EasyNet Modules on the patient.
EasyNet Cables and Connection
EasyNet cables can connect either to the hub itself, or daisy-chain to each other. Each module has two cable ports; one for connection, and one for daisy-chaining from module to module. EasyNet cables are available in 5, 10, 40, 70, and 180-inch lengths. Limb movement modules are placed on the wrists and legs of the patient. The SpO2 module is placed on the wrist or chest belt. All modules plug into the EasyNet Hub. The EasyNet Hub can be connected to the EasyNet input connector on the side of the Easy III amplifier. EasyNet cables are available in multiple lengths from 5 inches to 15 feet in length.
Please note: The SPO2 Module should be directly connected to the EasyNet Hub or Amplifier, not daisy chained to another module.
Connecting EasyNet Cables to EasyNet Hub or Module
- Insert the cable end into the cable port on the hub or any module. Push gently until the connection ‘clicks’.
- Push down on the cable lever to release the cable lock. EasyNet Hub to EasyNet Module Connections (shown with Easy III amplifier)
EasyNet Chest Belt
- The chest belt is designed to hold the Body Position and EasyNet Hub in a small pocket located on the front of the chest belt.
- Place the Chest Belt on the Patient
- Place the chest strap on the patient. Center the small envelope/pocket on the front of the chest.
- Insert the Body Position Module and the EasyNet Hub inside the pocket on the chest strap. The arrow on the front of the Body Position Module should be pointing up. Connect a short EasyNet cable from the Body Position Module to the EasyNet Hub. You can use any connector on the Body Position Module and Hub.
- Place the Limb Straps on the patient. Connect each module to the hub in the Chest Belt. When setting up your patients, route the cables through the chest strap to each limb movement module.
Section II: Recording a study
Starting a New Recording
There are three ways to start a new study. You can either create a new patient, select an existing patient, or select a scheduled patient created in Cadwell Scheduler or an HL7 connected application. If you choose to create a new patient, you will need to fill out the data fields in red. If you choose the select patient or scheduled patients tabs, find and select the patient using the search fields. You can search by Name, DOB, ID number, or Patient ID. The scheduled patient tab will also give you the option to sort by appointment date.
After you have entered or selected the patient, you can click on the recording modality (EEG, LTM, PSG, or ICU) to begin recording.
The information displayed in the Current Patient Info dialog below will be displayed after starting a recording. The information can be edited any time during the study. Click on OK to close the patient information dialog.
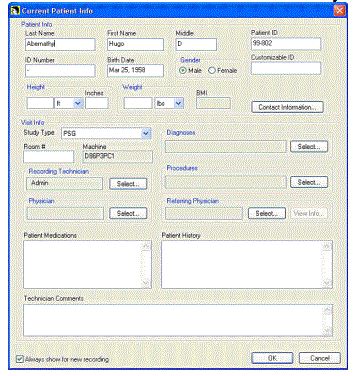
To being the recording, press the green record button to start acquiring data. Please review the guide below for a description of each button.
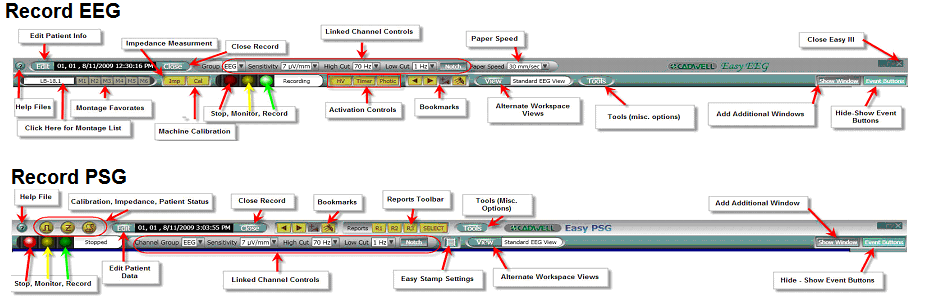
Checking Impedance from Software
Find and press the Impedance button in the guide above. The Easy III software will evaluate all inputs displayed in the impedance dialog during impedance measurement. When the impedance dialog is opened, Easy III will test the EEG inputs, then the reference inputs, ground electrodes, and active reference pairs. Waveform data is not recorded during impedance measurement. Check impedance and promptly return to data collection after evaluating impedance levels. NOTE: It is important that the user wait at least 10 seconds when the impedance menu is opened. This will allow the program to adequately check all inputs.
Impedance levels that are good will be displayed with green background color in the input. 5k- 20k will show a yellow background, and >20K will show a red background.
Auto-Reference Select – Place a check mark in this box if you would like the Easy software to find the lowest impedance reference electrode for use as a reference electrode. Note: The evaluation and selection of the lowest impedance electrode is only done during impedance measurement. After the reference electrode has been selected and the impedance measurement option is closed, the reference electrode will not be changed unless the impedance measurement option is opened again. The reference electrode can be manually selected by clicking on the drop down Recording Reference option. If a new recording reference is automatically selected, an event will be added to the event list.
Note the reference electrode is marked with a blue oval ring around the input. Available Reference Inputs: A1, T3, C3, Cz, C4, T4, or A2.
Checking Impedance from the Easy III Amplifier
• On the amplifier, press the 20K button while recording to check impedances greater than 20 kilohms. Press the 10K button to check impedances between 5 and 20 kilohms. Press the 5K button to check impedance’s below 5 kilohms. Each time an impedance button is pressed, all the impedance LEDS on the amplifier that are less than or equal to the kilohm level of the button pushed will light up.
• The Impedance-Live window will open in the Easy III software when the impedance button is pressed during recording.
• Press the OFF button on the amplifier to stop impedance measurement. If the OFF button is not pressed, the Easy III software will stop measuring impedance when the maximum impedance measurement duration is obtained. By default, this is set to 5 minutes.
The Event List
The Event List window summarizes all events associated with a recording. If the event list is not included in the current view, press the F2 button to display the event list. Click on a tab to select a specific category.
If you wish to delete an event, click on an event and click the Delete button to remove it from the Event List.
Marking Events
Hold the mouse cursor over any trace in a PSG record to show the options displayed below.
Respiratory Events
Place the mouse over a respiratory channel, then click and drag across to mark a respiratory event. As shown below, the Easy III software will instantaneously provide the event criteria:
• Duration of the event
• Estimated Percentage Drop in Airflow Signal Amplitude
• Minimum Sp02%
• Percentage Drop in Sp02%
• Minimum Pulse Rate
Marking Artifact
Follow the steps above for marking events, but hold down the Ctrl key while marking. Artifact can be scored for EKG, SpO2, BPM, ETCO2 and CPAP leak events. Artifact scoring will be scored with dashed lines and will not be considered in reporting.
Marking Events by Event Type
When you mark a respiratory event on the flow channel, a pop-up window will appear asking you to select a respiratory event type. Moving the mouse below the airflow channel will allow the user to select an event type before marking a respiratory event. This simulated image demonstrates the different events that can be marked on a channel by moving your mouse up or down:
Note: RERA events marking can be associated with any channel type. Edit a PSG montage and add a RERA event any channel.
Note: You can stamp events by placing the mouse over a respiratory channel and clicking on the right mouse button. This will automatically stamp a respiratory event. Right clicking on the event again will extend the duration of the event.
Event Details
Clicking on any previously marked event will display the Edit Channel Event window, which displays event type, event details, and the User’s name. The event may be erased by clicking on the Delete button
Easy Stamp
Easy III allows users to mark any event, at any time, in any window. Place the mouse over a sleep channel and right-click to stamp an event start. To extend the duration of the stamped event, right-click on the event bar again. The duration will increase each time you right-click the event.
Some events will automatically pull up an Edit Channel Event window, in which you can select a more specific Event Type, review the event details, and add a comment. The Event will also appear in the Event List window. Click on the Event to review the trace where it occurred.
Adding Lights Out, Lights On, Sleep Onset, CPAP, and O2 Events to a Recording
Click on a button in the PSG Events toolbar to add a session event.
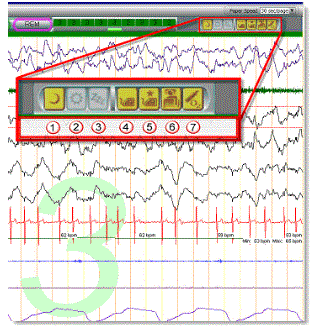
1. Lights Out – Click on this toolbar to enter a Lights Out event. Lights out will be placed at the first second of the present epoch. You can remove the Lights Out event by clicking on the button again, or by finding the event in the Event List and deleting it.
2. Light On – Click on this toolbar to enter Light On. Lights on will be placed at the first second of the present epoch. You can remove the Lights On event by clicking on the button again, or by finding the event in the Event List and deleting it.
3. Sleep Onset – Click on this toolbar to mark an epoch as sleep onset. Sleep onset will be placed at the first second of the present epoch. You can remove the Sleep Onset event by clicking on the button again, or by finding the event in the Event List and deleting it.
4. CPAP/BiLevel Pressure – Click on this toolbar to place a CPAP event in the trace window. Move the mouse to the location where you would like to place the event. Click the left button on the mouse to place the event. You can remove this event by finding it in the event list and deleting it. See image below for the setting options.
5. Optimal Pressure – Click on this toolbar to place an Optimal Pressure event in the trace window. You can remove this event by finding it in the event list and deleting it.
6. Body Position – Click on this toolbar to enter a Body Position Change. Move the mouse to the location where you would like to place the event. Click the left button on the mouse to place the event. If you are using a body position sensor, you can use this option to override or resume using the body position sensor during data collection.
7. Supplemental O2 – Click on this option to enter a supplemental O2 level. Move the mouse to the location where you would like to place the event. Click the left button on the mouse to place the event. You can remove this event by finding it in the event list and deleting it.
Appending a Recording
Once a record is closed, you must append to the record to continue recording onto the same file. To do this, open Record Data and highlight the patient you wish to append to. You can click the append button to append to the most recent recording or right click on the highlighted patient for a detailed list. Easy III cannot combine two studies after they have been recorded.
Section III: Reviewing a study
Reviewing Records
Open Easy III Review Data and use the search fields to find and select the patient. In the main window, you can search by name, patient ID, recording status, and patients assigned to your username. For expanded options, you can also select the detailed search button to search by name, ID, date, description, status, study type, instrument, or file location. Once you find the record, double click or press open record or select.
Maneuvering Through a Record
After opening a record, the Easy III software will display the first recorded page of the record. There are multiple options for navigating the record.
You can press the space bar to move one page forward, press the left/right/page up/page down key to move forward or backward, navigate with the mouse cursor or scroll wheel, auto page forward, or move using the position bar at the bottom of the screen.
To Auto-Page forward, hold down the Control (CTRL) key on the keyboard while pressing the + key on the keyboard. To increase the paging speed, press the CTRL + key again. Keep pressing the combination of keys to increase the paging speed. You can reduce the paging speed by pressing the CTRL – keys. To stop auto paging press the space bar or click in the trace window.
If the record is currently being recorded, click the View live data button to return to live recording mode.
Options for Viewing data
1.Check the box labeled “As Recorded” to view the data with the settings that it was collected with.
2. For sleep studies, an option for “As Scored” is available. Choose this to view the study with the settings that the tech had selected at the time of scoring.
Keyboard shortcuts
Please see Easy III: Keyboard Shortcuts for a detailed list.
Changing a Montage
1. Click on the M1, M2, M3, M4, M5, and M6 buttons at the top of the page to select alternate montages.
Adjust Channel Settings
1. Place the mouse over the channel name displayed on the left side of the page. Click on the left button on the mouse. Move the mouse over the green pop up menu to modify a specific setting displayed.
2. Place mouse over the channel label and scroll the mouse wheel up or down to increase or decrease the sensitivity.
Changing Paper Speed
1. Click on the paper speed drop down menu in the upper right-hand corner of the trace window.
2. Press the CTRL key and the up arrow key or CTRL key and down arrow key to increase or decrease the displayed paper speed.
Bookmarks
A bookmark marks a segment of the recording, noting its current montage, filter, sensitivity and paper speed settings. Bookmarks allow users to quickly review notable sections of the EEG/PSG record and are also used for including segments of the EEG/PSG in reports.
To add a bookmark, reposition to the area of the trace data that needs to be marked and click on the add a bookmark icon in the toolbar. The bookmark can be renamed to a more specific title if desired. Also, the duration pulldown menu offers default settings that the user may select to determine how long the bookmark will mark. The length of the bookmark can also be specified by entering the Elapsed Times to mark from/to the bookmark. Once these settings are complete, select OK. The grid lines will change color and a colored bar will appear on the bottom of the trace window with the Bookmark title. The Event list also has a Bookmarks tab which will display the bookmark as well. The current montage, filter, sensitivity and paper speed will be saved with the bookmark. More than one bookmark may be created at the same location if they have different settings.
A bookmark can only be created on a page that has been completely recorded.
Use the right/left arrows in the toolbar to scroll through bookmarks within a trace window or press CTRL B to move to the next bookmark. Click the flagged button to view a list of bookmarks. All of the bookmarks that have been created will be displayed in the window. From this window, you can delete, print, or navigate between bookmarks.
Q-Video Playback and Review
Q-Video is a digital video recorder and player designed by the Cadwell development team. The software has a motion detection algorithm that detects movement from a video signal. Movement can be accentuated with color and displayed in the video picture to assist clinicians in detecting subtle movements. All video is time synchronized with recorded waveform data. Q-Video Playback Controls used During Record Review Starting or stopping video playback is easy. Click on the video picture to start/stop video playback!
- A. Playback Rate – Adjust the playback rate during review. (1.0 is real time)
- Double arrows – advances video and trace data several pages.
- Single arrow with line – advance video frame by frame.
- Play button – plays back video at selected Playback Rate.
- Snapshot Button (camera icon) – Click on this option to take a snapshot of the patient. The snapshot is saved with the record. If the video is deleted the snapshot will still be available for future review. Snapshots can be printed in the Snapshot Report.
- Q-Video motion (person icon) – Select this option to turn on the Q-Video motion highlight feature. Movements will be accentuated with color. Snapshots with motion highlighting can be saved and displayed in the Snapshot report.
- Volume control slider bar with a ‘mute’ button displayed to the right of the slider bar
Zooming Q-Video
Click and drag the mouse over the Q-Video image data subset that you wish to enlarge. When you release the click, a floating Zoom window will appear. Move and resize the Zoom window as necessary during a procedure or review. Virtual panning is available by holding down the left button on the mouse in the Zoom window. You can pan the video by moving the mouse while holding the left button down. Scrolling the mouse wheel will also zoom the window.
Patient Status Window
After closing a record, the Patient Status window will appear allowing you to change the progress of the recording. The following options are available by default:
- Ready to Score: Study is ready to be scored.
- Ready to Read: Study is for review by the physician.
- Ready to Archive: Study has been reviewed by the physician and can be placed in Long Term Storage.
- Edited, Ready to Archive:
- Video Edited, Ready to Archive
- Waveform Edited, Ready to Archive
Section IV: Generating a Report
Reports Overview
Easy III reports allow you to print patient information, record information, and pages of EEG specified by bookmarks. Reports can also include technician comments, impedance history, file access history, and Q-Video snapshots. Reports will be generated in a Word formatted file which you may edit or modify. Most modifications you can make in a word file can also be made here, however, it will only apply to the currently generated report and not to any additional reports generated.
The Report Generator can be launched during data collection and review. Click on the Report Toolbar to access reports.
- Select Report
- Click on the plus sign to access the list of available report templates.
- Click on a template to view the Description. A blue ball with a yellow arrow will designate which template is selected.
- Click the Show All Users’ Reports box to access the list of all report templates available.
- Click the OK button.
- Wait while the Report loads and collects its tokens.
Associating Documents with a Patient Record
The Associate Document option allows the user to associate .pdf files, documents, and other electronic files with an Easy III record. After files have been associated with a patient record, they are managed by the Easy III record management system (archiving, moving records, deleting, etc.). After a patient name is highlighted in the patient list, all documents, questionnaires, and photographs associated with the patient will be accessible through the Review Data dashboard. The user can double-click on any item in the Reports and Documents list to quickly view the file (without opening the waveform data). Most file types can be associated with a patient record. When a file is selected, it is copied to the default data folder and associated with the selected patient.
To associate an electronic document to a particular patient record, launch the Easy III Review Data dashboard by double clicking on the icon on the desktop. Highlight the patient record that the document needs to be associated with and click on the Associate Document button. A window will appear, browse out to the location of the electronic document that needs to be associated and select Open. Immediately the software will associate the document.
To delete a report associated with a record, locate the patient via the Easy III Review Data dashboard. Click on the Associate Document button, find the report, right click and delete.
Section V: Record Manager
Once a patient record has been recorded or reviewed, Record Manager can be used to transfer or backup records.
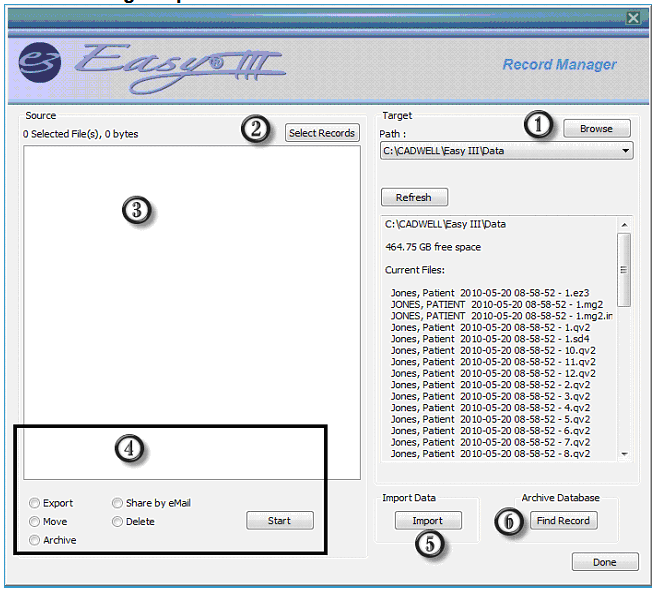
- Select a location to export or move your selected files. Click on Browse button to select a location. Click on the drop down arrow in the path to select previous paths used.
- Select Records you would like to move or copy. Note: Several records can be selected at the same time by holding down the CTRL key selecting multiple records.
- All records selected will be displayed in this window. File size will be displayed adjacent to each record. Waveform data will be displayed with red checkmark adjacent to the waveform file. If Q-Video data was recorded with patient data, each video file will be listed in this window. Remove the check box from the video file segment(s) if you do not want to copy or move the video file.
- Record Manager Controls
- Importing Data. Click on the Import button to copy a file from another media to the local computer.
Archive – The archive feature will move the selected file(s) to the specified target (number 1 in the illustration above). When the Archive option is selected, the user will be prompted with an option to Delete the record(s) after Archiving. If the option is not selected, the record will not be deleted; however, the status will be changed to Archived, Ready to Delete. If the file is deleted after archiving, the file will be placed in the Windows Recycle Bin after it has been archived. Note: The Recycle Bin must be configured to save deleted data and have adequate space available. If you are archiving data from a network location to an archive media, data will not be placed in the Recycle Bin. The name of the selected patients will be placed in the Archive Database. Note: The date, time, and username that archived the file will remain in the record history file.
Move – This feature will move the selected files to another Easy III system selected in the Target options (number 1 in the illustration above). Note: The file will be moved to the new target. After the file is removed from the local machine, it will not be placed in the Recycle Bin. Note: The date, time, and username that moved the file will be placed in the record history file.
Share by eMail – This feature will launch your local email client (if available). The selected patient files will be placed as an attachment to the email. Note: The date, time, and username that emailed the patient files will be placed in the record history file. (Please keep in mind that most Email Clients have an attachment size limit. If the record has video or is longer than 60 minutes, it will need to be transferred through another method.)
Delete – This feature will delete the selected files. The files will be placed in the Windows Recycle Bin. The Recycle Bin must configured to save deleted data and have adequate space available. If you are deleting data from a network location, data will not be placed in the Recycle Bin. The date, time, and username that deleted the file will remain in the record history file.
Export – This option will allow the user to copy the data and video files to the selected target. Please note, this option will only copy the data from Easy III and will need to be imported on a system with Easy III software. If the record needs to be opened without Easy III software, please see the next section on the Stand Alone Viewer.
Section VI: Stand Alone Viewer
Easy Record Viewer (Free Viewer)
Records can be copied to any destination that can browsed to via Windows with a free record viewer. Hold down the CTRL key and click the records to be copied if more than one record is desired. If multiple records were copied, a menu listing the records will display, highlight the record to review and click open. If records were copied to a network location, simple double click on EasyReaderLaunch.exe located in that destination and the menu of records available to view will populate. Once the viewer has been created it can be copied to another location at a later time.
Instructions for Using Copy Record and Viewer
- Double click on the System Utilities icon
- Select Copy Record and Viewer
- Select Browse to select the destination where the record(s) and viewer should be copied to, the below browse window will appear, identify the destination and click OK.
- Click Select Record(s). To select multiple records to copy with viewer, simply hold down the CTRL key as you click on the records needed and hit Select when complete.
- If Report(s) need to be copied as well, simple click on the Select Report(s) button, locate the reports and select Open.
Click on Export; the software is now copying the patient records and reports with viewer to the destination selected.
- To view the records, either insert the external media or browse out to the destination where the files were copied. Double click on EasyReaderLaunch.exe.
- Select the record that needs to be viewed and click on Open.
- The record is now open in the viewer and ready to be reviewed.
*Note: To remove records from this list that no longer need to be viewed, simply browse directly to the destination folder via windows and delete the files, this will remove them from the list.
If Q-Video data was recorded with the patient data, synchronized video playback will be available. Place the mouse over waveform data to dynamically playback video with record viewer. Press the play button on the Q-Video player to watch the video playback.
Photic event markers have been added to the position bar and the trace data screen. Drag and drop the Photic Event Tool over a specific channel. Click on the expand arrow displayed in the photic channel to display full height photic stimulator event markers.
Record Viewer Features
- Place the mouse over the trace window. If you have a wheel on your mouse, roll the wheel to move forward or backwards through the recorded data. Left click on the trace (montage) labels to adjust channel settings.
- Right click in the trace window to select the following options:
- Satellite Display (select this option to view multiple pages in Satellite View.
- Print Display
- Copy Display (to paste the trace data in other applications such as Word or PowerPoint
- Hide Trace Labels
- Hide Sleep Staging Watermark
- Hide Channel Events (to hide sleep events added to specific channels)
- Hide Events (to hide changes made to recording montage)
- Enable Measurement Tool (to measure frequency, amplitude, and duration)
- Performance Measures
- Additional trace label options –
- Click on the place holder to drag the channel up and down.
- Click to Hide or Delete a channel
- Click on the up/down arrows to modify linked channel sensitivity. Roll the mouse wheel to adjust linked channel sensitivity.
- Click on the slide out the option to adjust channel settings.
Section VII: Troubleshooting
Please view Easy III: Basic Troubleshooting for EEG and PSG troubleshooting tips.