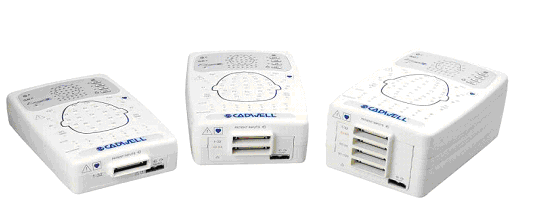
Section I: Basics of Hardware
Section II: Installing the software
Installing or Updating
Before Installing or Updating, there are a few tips we recommend.
- All workstations and Servers must run the same version of software. You’ll be able to find the version in the programs menu within the control panel. If you upgrade one system, you must upgrade them all.
- There is only one application server in each environment. If you’re unsure, install the software as a workstation and leave the server field blank.
- If you are installing Easy III for the first time, please contact support at 1-800-245-3001 to schedule an appointment. A new installation will require you to license the software while an upgrade will use the existing key.
- If your systems are networked, discontinue using all systems until the upgrade is complete. If you are unable to discontinue using systems that are actively collecting data, you will need to upgrade them as soon as the recording is complete.
- Although not required, we recommend that you allocate 5% disk space to System Protection on each workstation.
- We recommend you keep documentation on the PC Name of each computer, which equipment is connected, and the location of the hardware.
Software Compatibility
Easy III is compatible with Windows 7 64 bit or Windows Server 2008 R2, and Windows 10 with Easy III version 4.1. Windows Server 2012 R2 is also supported in Easy III 4.0.2+
Starting the Software Installation or Upgrade
- Place the disc in the disc drive in the computer
- Click on the EasyIIISetup.exe file located on the installation disc.
- After you have clicked on the EasyIIISetup.exe file on the installation disc, the Easy III installer will determine if the system needs a full installation, or if an upgrade is required. The installer will automatically upgrade Microsoft.Net, video, and audio codecs if needed. If you are prompted to restart the computer, restart the system. The installation will continue after the system is restarted. (Note: Leave the disc in the disc drive when restarting the computer.)
- If you are upgrading the Easy III software, the installer will install the appropriate Workstation and Office Server programs for you. If you are installing Easy III software for the first time, the installer will ask if you select the name of the office server. The installer will also ask if you want to install the scheduler and clinical database. Install both if you are unsure. After the installation is complete, you will be prompted to restart the computer. Important Note: Leave the installation disc on the computer during the restart. If additional files are needed after the restart, the Easy III installer will automatically access the disc as needed. Once the installation is complete, you may remove this installation disc.
- Congratulations, the software, is installed. You can repeat the same steps on any additional Easy III computers.
Easy III Data folder settings
C:\Cadwell\Easy III\Data is the default data location for each station. Workstations (recording PC’s) must record to the local hard drive and cannot be configured to record to a network location. The application server can in order for a remote machine to view a record, the data folder (C:\Cadwell\Easy III\Data) must have the share name “E3VideoData”. Follow the instructions below to correctly configure your system.
- In Windows Explorer, go to the Data Folder. Right-click on the “Data” folder and select “Properties.” Select the “Sharing” tab and select the “Share this folder” radio button. Type “E3VideoData” for the share name.
- Click the “Permissions” button. If the desired group or user (for example, “Power Users,” “Easy III Users”) is not in the list, select the “Add…” button, select (or type) the desired group or user and click “OK.” Now, for the desired group, click the “Allow” “Full Control” checkbox and click “OK.”
- Now, select the “Security” tab. If the desired group or user (for example, “Power Users,” “Easy III Users”) is not in the list, select the “Add…” button, select (or type) the desired group or user and click “OK.” Now, for the desired group, click the “Allow” “Full
Control” checkbox and click “OK.” - Please note that users will need Full permissions to this folder.
For more information on folder permissions, please view Antivirus and Encryption settings for Easy III.
Easy III Network Card Setup
The Easy III system communicates with the Power Com Module via dedicated Ethernet link set to a static IP of 192.168.113.66. Beyond the Easy III system, other components will also require a dedicated Ethernet connection, such as an IP camera or CPAP machine. Please be aware you may need 3-4 Ethernet ports to run a study.
To configure the IP address in a Windows operating system: Configure the Network Card for Windows 7:
- Click the Start Orb.
- Click on the Control Panel.
- Change the “View by:” to “Large Icons” or “Small Icons.” Do not use “Category View.”
- Click on “Network and Sharing Center.”
- Then click on “Change Adapter Settings” in the left-hand task pane. This will show all the network connections available on the computer.
- Right-click on the LAN or High-Speed Internet connection that will be used to communicate to the base unit and select “Properties.”
- Uncheck all the protocols in the list except for the Internet Protocol Version 4 (TCP/IPv4).
- Then double-click on that protocol and change the radial button from “Obtain an IP address automatically” to “Use the following address.”
- Input the default Cadwell® IP address. It is 192.168.113.66. The default Subnet Mask can be used of 255.255.255.0.
- Once those addresses are added click on the Advanced button in the bottom righthand corner of the screen. Click on the WINS tab and uncheck the “Enable LMHOSTS lookup” check box and change the NetBIOS setting from Default to “Disable NetBIOS
over TCP/IP”. - Click OK three times to get back to the network connections page.
- Once again, right-click on the LAN or High-Speed Internet connection that will be used to communicate to the base unit and click on “Properties.
- Click on the Configure button in the upper left corner.
- Click on the Advanced Tab then select the “Speed and Duplex” listing. It might also be displayed as “Media Type, Connection Type or Link Speed & Duplex.” Some Windows 7 systems will have a Link Speed tab.
- Click the drop down list on the value right and select 10 Mbps Full Duplex.
- Click on the Power Management tab. Deselect the “Allow the computer to turn off this device to save power” check box and then click OK. Note not all network cards will have a power management tab.
- Right-click on the LAN or High-Speed Internet connection that will be used to communicate to the base unit and click on “Rename.”Type in Easy III Amplifier and press Enter.
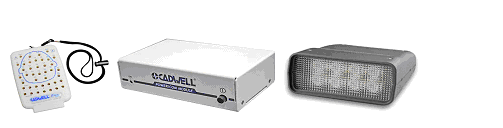
Camera Setup
Easy III offers video recording features for both PSG and EEG studies. The system can connect to a camera via IP address or Dazzle adapter. In each case, we recommend that the camera is directly connected to the PC for optimal use.
Connecting a Sony IP only camera:
- Connect the ethernet cable to the PC and Camera. Go to Network Adapters on the PC from the Control Panel and choose the network adapter being used for the camera. Double click on the network adapter and click on Properties. Select Internet Protocol Version 4 (TCP/IPv4) and set a static IP of 192.168.21.1 and subnet mask as 255.255.255.0. Leave everything else unchanged.
- Open a browser and type http//192.168.21.11 in the address bar. The video should be visible in the browser. At this point, a prompt may appear asking to install an add-on, allow this to occur.
- Launch Easy III and verify that the camera is available as a video source in the Q-Video Settings dialog.
Connecting a Sony BNC camera:
- Connect the Dazzle adapter to the computer and install the driver from the DVD. Connect one end of the BNC cable to the camera and connect the other end of the cable to the yellow Dazzle port using a BNC – RCA adapter.
- Connect the network cable to the camera and PC.
- Go to Network Adapters on the PC from the Control Panel and choose the network adapter being used for the camera. Double click on the network adapter and click on Properties. Select Internet Protocol Version 4 (TCP/IPv4) and set a static IP of 192.168.0.99 and subnet mask as 255.255.255.0. Leave everything else unchanged.
- Open a browser and type http//192.168.0.100 in the address bar. The video should be visible in the browser. At this point, a prompt may appear asking to install an add-on, allow this to occur.
- Launch Easy III and verify that the camera is available as a video source in the Q-Video Settings dialog.
Section III: Software Basics
The main Easy III program relies on subprograms for some of it’s features. This was designed to allow network communication, hardware communication, and database synchronization to take place while the workstation is not actively recording a study. This section will go over the subprograms and their functions.
Workstation subprograms
Listed below are some of the program names and their function:
EasyIIIDataserver: Handles Local Acquisition
RecordManager: Handles local data management
MedpipeWS: Communication between server and workstation
This group of programs may also run as a service on a reader or server. (EasyIIIDataserverservice)
QMAssistant/EasyIIISynchronizationservice: Database synchronization between the server and workstation
Centralized Data Manger: File transfer to the server.
ApneaTrak: Home Sleep Testing management.
Server subprograms
RPOffice: Synchronizes databases between workstations.
MedpipeOffice: Communicates between the workstations and server.
These programs will run as EasyIIIOfficeserverservice and should only be run on the server. The server will also run EasyIIIDataserverserivce and EasyIIISynchronization service. If you encounter synchronization issues or difficulty accessing data on another workstation, restart these services in any order.
Section IV: Data Management
Easy III stores record data and settings in the folders C:\Cadwell and C:\QMWorkstation. Please make sure anti-virus and firewall settings don’t interfere with data collection.
For a remote machine to view a record the data folder C:\Cadwell\Easy III\Data must have the share name “E3VideoData”. Make sure the folder has the proper user group permissions and is accessible remotely. If this is an office server, it’s also recommended to share C:\QMWorkstation as it is sometimes needed when installing or repairing software.
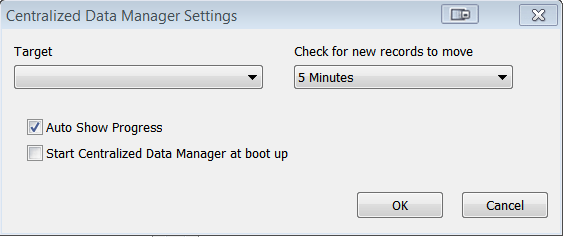
Transferring data to the server
Once a study has been finished, data can be moved automatically or manually to the server. The automatic method requires a secondary program named Centralized Data Manager or CDM. This .exe is located in C:\Cadwell\Easy III\CentralizedDataManger.exe. Once it’s started, you should see computer icon in the notification area. Right, click it to view setup options and set the target to the office server. Checkmark “Start Centralized Data Manager at boot up” to start automatically. Change the “Check for new records” to the desired amount; we recommend a setting of 1 hour to allow for appending records. In Easy III 4.0.2, CDM will also allow you to limit when records move. We recommend blocking out time between 5:00 PM and 8:00 AM.
Archiving
As the hard drive fills, we recommend archiving studies every 3 to 6 months. For more information, please view Archiving Studies in Easy III.
Section V: General Maintenance
- Once every week: Reboot all hardware and workstations. This will ensure that the equipment is running as smooth as possible.
- Once every month: Windows updates and security software should be up to date. To keep the software running efficiently, we recommend running a database compact and repair on all machines to streamline the software and prevent slowness. The utility can be found at C:\Cadwell\Easy III\DatabaseCompactRepair.exe.
- Once every three months: Archive old studies onto a storage device.
- Once every year: Update video drivers, flash and .net framework. Check all equipment for damage and wear.
- We highly recommend that all scheduled tasks do not take place during recording. This includes windows update, antivirus lists, policy updates, and software updates. Please schedule them before or after recording.