In the Easy III System Utilities; go to System Setup. Choose the button Data Map. In the Edit Data Map window; choose the Data Map that is used for PSG. Click on the Edit button.
In the Edit Data Map window; make sure that your Data Map contains a CPAP (Set Pressure) channel set to the input DC1, and CPAP Flow set to DC2. You may also have your DC3 and DC4 channels set up to other CPAP channels – they are calibrated in the same manner.
Click on Edit DC Calibrations. From the DC Input Calibrations window, see if the device is listed.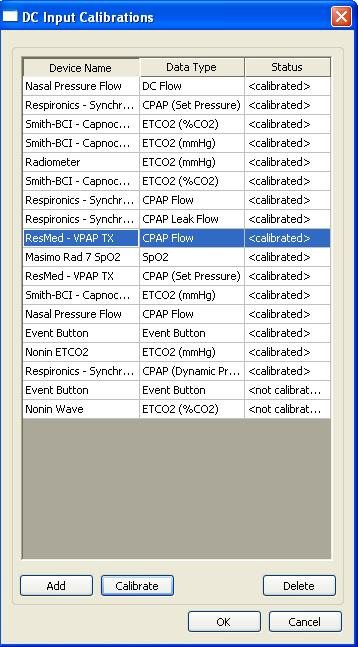
If it is listed for CPAP (Set Pressure), highlight that device name and click on Calibrate. If it is not listed, click on Add.
In the Device Calibration window; if this is a new device, enter the device name into the Name field and choose the Data Type from the pull down menu. If this device had been chosen, these fields will be filled in.
Choose radio button by Read Voltage from Attached Device for each Calibration Value.
Check Device Input box on right to see if the correct DC channel is selected for the device. If not, click on the box and in the Device Input for Calibration window; choose the correct DC channel from the pull down and click Update.
 Click on the EasyCare TX Icon on the desktop. From Menu, select Connect. From the Select Device window, choose the device number to connect to and click OK.
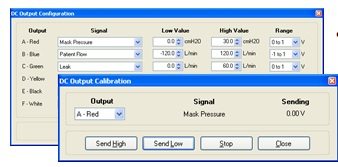
After connecting, from the Menu drop down, pick DC Output Configuration. Click calibrate. Identify the output that corresponds with the channel being calibrated in Easy III and click Send Low.
In the Easy III program Device Calibration window, select the button on the right containing 0 H2O.
Make sure that your DC input connections are correct from the TX Control to the DC inputs on the Easy III amplifier. Click OK in the DcCalibrationManager window.
The green bar will move across and you should see a 0 volt value for the DC channel being used in your Data Map. When the green bar completes (if the DC value is 0) click Update.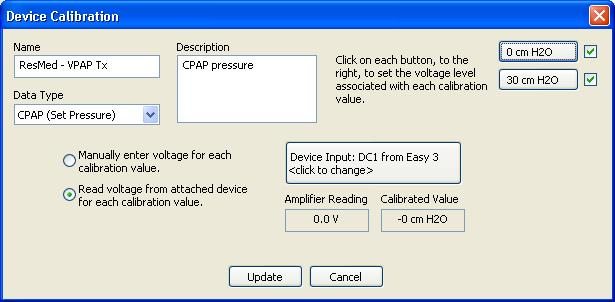
In the EasyCare Control window, click on Stop and then Send High. When you see the 1V displayed in the Amplifier Reading in the Easy III Device Calibration window, click on the 30 cm H2O button.
Make sure that your DC input connections are correct from the TX Control to the DC inputs on the Easy III amplifier. Click OK in the DcCalibrationManager window.
The green bar will move across and you should see a 1 volt value for the DC channel being used in your Data Map. When the green bar completes (if the DC value is 1) click Update.
Follow the same procedure for each DC channel that you will be using. When you are finished, say OK in the DC Input Calibrations window.
In the Data Map, click in the input box for the CPAP Set Pressure channel. On the Device tab on the left, click on DC1. A DC Input Calibrations box will appear. Click on the EasyCare CPAP Set Pressure channel showing in the list and click Select. Repeat the procedure for CPAP Flow and CPAP Leak if calibrated and used in the Data Map by clicking on the Input for the channel and choosing the appropriate DC Channel from the Device tab.
Add the CPAP channels to your montages from the Data Type tab on the left of your montage.
![]()